Performing software updates on all ViaLite M&C Products
ViaLite continually works to improve its products and software. As part of this, software updates are regularly issued for the Horizons HRC and site controller products, which are used to fully monitor and control ViaLiteHD RF over fiber systems.
The following ViaLite products can be updated upon the release of new Monitoring and Control (M&C) software updates.
This guide explains how to perform the updates to the products. See below for the Monitoring & Control HRC-3 module or jump to instructions for updating the ODE-MINI and GPS Splitter.
How to update the HRC-3 software
- Log into the HRC-3 using a suitable web browser (e.g. Chrome) and the technician login details.
Username: Technician
Password: tech
Fig. 1 Web GUI software version
- Check the current software version by clicking on the image of the M&C module in the GUI.
Status > Inventory > Software version
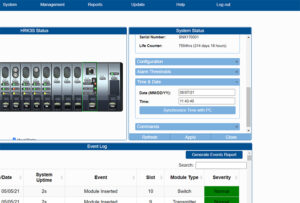
- Scroll down to “Time and Date” and check that the time and date are set correctly.
If the time and date are at default (1970) then this will need to be corrected before the update can proceed. Use the “Synchronize Time with PC” button or manually enter the time and date in the relevant fields, then click apply.
Fig. 2 Web GUI Time and Date
Some early versions of the HRC-3 software require that the time and date be set using an SSH Terminal. If you are unable to set the time and date using the web GUI, please see the section at the end of this guide on setting the time and date using SSH.
- Download the new software files available at https://www.vialite.com/downloads/software/#firmware
Open the zip files and extract the relevant file for your HRC card. Save the file to your PC.
- Go back into the Web GUI and select the “update” section in the top banner of the Web GUI.
Fig. 3 Update selection
- In the software update box that appears, go into the “File Upload” section and use the “Choose File” button to select the file you have just saved to your PC.
- Click upload and after a few moments (around 15 seconds) the button will change to “Click to Apply Update and Reset”. Click this button to install the update.
Fig. 4 File Upload
The update will take around 3 minutes to complete for the HRC-3. The Web GUI will default to the login screen whilst the update is progressing.
After the update is complete, log back in and check the software version in the System Status – Inventory screen. This should now match the newest version available on the website.
Further Assistance
In the event that you are unable to complete these software updates for any reason, please contact our dedicated Technical Support team, by emailing technicalsupport@vialite.com or by phoning +44 (0) 1793 784389.
ODE-MINI and Local Integrated GPS Splitter software
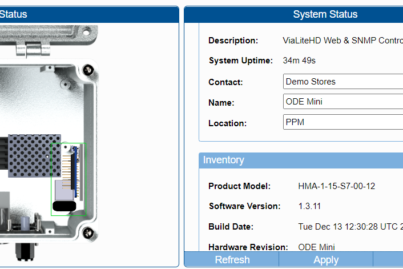
The ODE-MINI contains the ViaLite Site Controller. The software version can be checked in the web GUI by clicking anywhere other than the PSU or internal module.
Fig. 5 ODE-MINI web GUI software version
The Local Integrated GPS Splitter contains an internal HRC-3 module, so the update uses the same file as for the HRC-3. The current software version can be checked by clicking on the LAN port image in the web GUI.
Fig. 6 GPS Splitter rack web GUI software version
Further Assistance
In the event that you are unable to complete these software updates for any reason, please contact our dedicated Technical Support team, by emailing technicalsupport@vialite.com or by phoning +44 (0) 1793 784389.
Setting the Time and Date using an SSH Terminal
If you are unable to set the time and date in the Web GUI:
- Open an SSH Terminal (such as PuTTY). Select SSH connection and enter the IP address of your HRC module (chassis).
- In the login command window that appears, type in the login and password.
Username: Technician
Password: tech
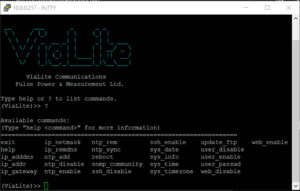
- You will now be presented with the ViaLite command prompt. Use ‘Help’ or ‘?’ to see the list of available commands.
Fig 5. PuTTY configuration
- Enter the date using the command >>sys_date YYYY-MM-DD
- Enter the time using the command >>sys_time hh:mm:ss
- Check the system time and date has updated using the command >>sys_date (this will show you the set date & time).
- Once the time and date is set in this manner, exit the command line interface using the command >>exit. This will close the PuTTY window and exit from the system.
- Go back into the web GUI to confirm that the time and date has been set correctly. The software update can now be completed following the instructions above.
Fig. 6 PuTTY command line prompt

 +44 (0) 1793 784389
 +1 (855) 4-VIALITE
 sales@vialite.com
 Click to expand
 Click to expand
 Click to expand
 Click to expand
 Click to expand
 Click to expand
 Click to expand

